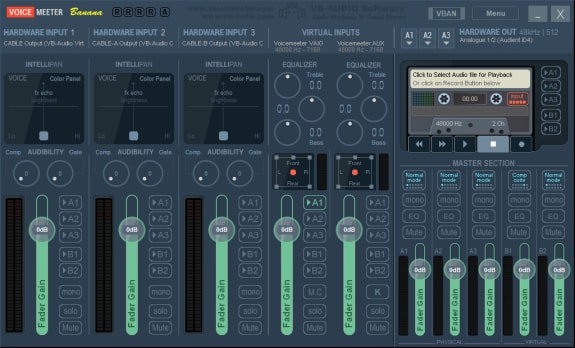
Want to patch audio from multiple interfaces through to your digital audio workstation on seperate tracks? Here’s how VoiceMeeter can help.
Imagine you want to live stream a session that involves multiple audio sources. Let’s say that these sources include microphones of different types (i.e. XLR, USB) and different media players on your computer (i.e. Spotify, YouTube). Imagine further that you want to process and mix these sources separately.

The best place to do that is a DAW like Cubase, Logic, Live, or my personal favorite Studio One.
The Problem 
There’s just one problem: DAWs typically work with a single audio interface, whereas your sources might come into the computer via different interfaces.
It means:
- Your DAW will either record audio from your USB microphone (that represents its own audio interface) or your XLR microphone (which is connected via a separate USB audio interface). Simultaneously recording two interfaces apparently is impossible in most DAWs today.
- Also, to record audio from different media players, you will need to route their audio to the same interface. This interface will mix these sources already into a single audio signal before entering your DAW (instead of forwarding them as separate inputs).
The Solution 
Fortunately, there is software that can simultaneously work with sources from more than one audio interface and forward these sources on separate tracks to your DAW: It’s called Voicemeeter. The best: The two entry level editions are free.

The Challenge 
Mixing audio from multiple sources and routing the master mix to your DAW is straight forward in Voicemeeter. What’s less intuitive, is how to route the sources as multitracks to your DAW so that you can process and mix the sources there. This tutorial is here to help!
Tutorial 
Step 1: Select the Appropriate Voicemeeter Edition 
Voicemeeter comes in different editions. Pick the one that suits your needs based on the amount of interfaces it can handle. I picked “Banana” since it offers enough channels for my use and still is free.
Step 2: Set Your Main Hardware Output 
After downloading and installing your instance of Voicemeeter, the software will ask you to define the main audio interface (“A1”).
Step 3: Configure the Master Interface 
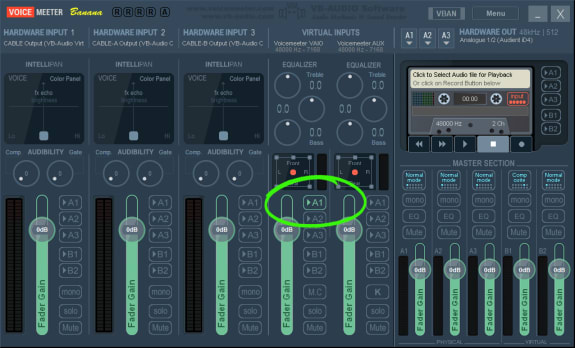
Next, decide which of Voicemeeter’s virtual interfaces you want to use to carry all tracks. In this tutorial, I’ll go with the “Voicemeeter VAIO” interface (or “B1” for that matter). Send this interface’s output to your main hardware output by activating the “A1” routing as shown in the following screenshot:

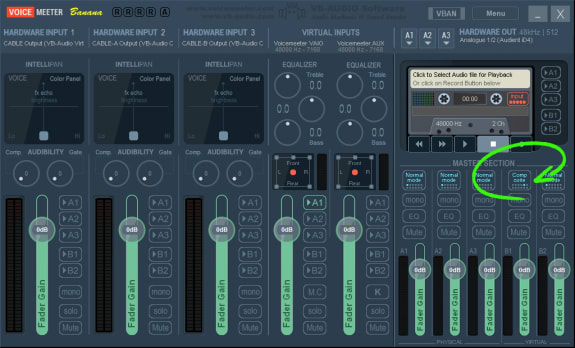
In the “Master Section” in the lower right half, change the first setting of the B1 track from Normal mode to Composite by clicking on it until the proper value shows:

Step 4: Distribute Sources on Channels 
Open the System Settings / Options dialog from the menu. In the area called “PATCH COMPOSITE” (see screenshot below), select which input track should be put on which output track. Click on each one of the eight channels and map the input that you want to correspond.
In my case, I routed …
- the left and right tracks from “HARDWARE INPUT 1” to the first two channels,
- the left and right tracks from “HARDWARE INPUT 2” to the third and fourth channel respectively,
- and so on for the third hardware input as well as the Voicemeeter virtual AUX input
All in all, I now can use four distinct audio sources and route them to separate tracks, all on a single one audio interface.

Step 5: Configure Your DAW 
With Voicemeeter set up, configure your DAW to use the Voicemeeter VAIO interface. Since this interface receives the four stereo or eight mono tracks as inputs, you now can record or manipulate these inputs as you would with any other track in your DAW.
The output of your DAW is sent back over the Voicemeeter VAIO interface and routed to your main hardware output where you can listen to the final mix.
Conclusion 
This tutorial showed how Voicemeeter can be used to route audio from multiple sources to your DAW—all while conserving these sources on multiple tracks. This will enable you to process and mix the audio from each source separately or in any combination.
The two important, yet less intuitive steps are to use the Composite mode on Voicemeeter’s virtual audio interface and then patch the desired inputs through to the available tracks of that virtual interface.
Pro Tip 
VB-Audio, the developer of Voicemeeter, have other very useful software in their portfolio. For example, the virtual audio cables are perfect for routing the output of your media players to separate hardware inputs in Voicemeeter.

Michael Schmidle
Founder of PrioMind. Start-up consultant, hobby music producer and blogger. Opinionated about technology, strategy, and leadership. In love with Mexico. This blog reflects my personal views.
Jul 11, 2024 · 3min read
Integrating Termly With Nuxt 3
Integrating Termly’s consent management with Nuxt 3 turns out to be harder than just inserting a script tag. Here’s a solution that resolves hydration mismatches and UI glitches, ensuring smooth functionality and user experience. Continue…
Nov 15, 2023 · 2min read
Mastering Keyboard Interactions in Shadcn-Vue: A Fix for Complex UIs
In the intricate dance of UI components within Vue applications, a misstep can disrupt the rhythm. Discover how a straightforward tweak can harmonize your keyboard interactions in shadcn-vue in complex nested components. Continue…
Sep 26, 2023 · Nov 11, 2023 · 2min read
The Better Nuxt Directus Authentication Middleware
The Nuxt Directus docs give you a basic auth middleware, but it’s got some quirks. Here’s how to bulletproof it. Continue…
Oct 4, 2021 · 4min read
Being Productively Creative—Artist vs. Designer
Have you ever experienced “writer’s block” or “masterpiece syndrome?” Here’s some advice on how to frame your mind, get into problem solving and be productively creative. Continue…


